Admittedly we are huge fans of Roots.io and their products, primarily Bedrock and Sage.
So when we inherit a vanilla WordPress site from another developer, the first thing we do is convert that site over to the Bedrock Framework.
Here we’ll show you the steps we take to convert a vanilla WordPress site over to Bedrock, and down below that we’ll show you how to convert it back.
Table of contents
Requirements
To effectively change a site from vanilla WP over to Bedrock, you’re going to need a local development environment as a lot of what we do is done from the command-line. We highly recommend this tutorial on Setting up a Dev Machine by Jeffrey Way.
Make sure you have the WP-CLI tool installed on your machine as well.
It would really help if you have a decent understanding of how both the normal WordPress folder structure works as well as an added bonus if you have a basic understanding of the Bedrock framework.
You will need a full copy of the current Vanilla WP website with its database working locally on your machine.
Convert Vanilla WordPress to Bedrock
Step 1 – Installing Bedrock
Create a new database on your local environment for this new website. I’m not going to go into how to do that, as most WordPress devs are comfortable with that step.
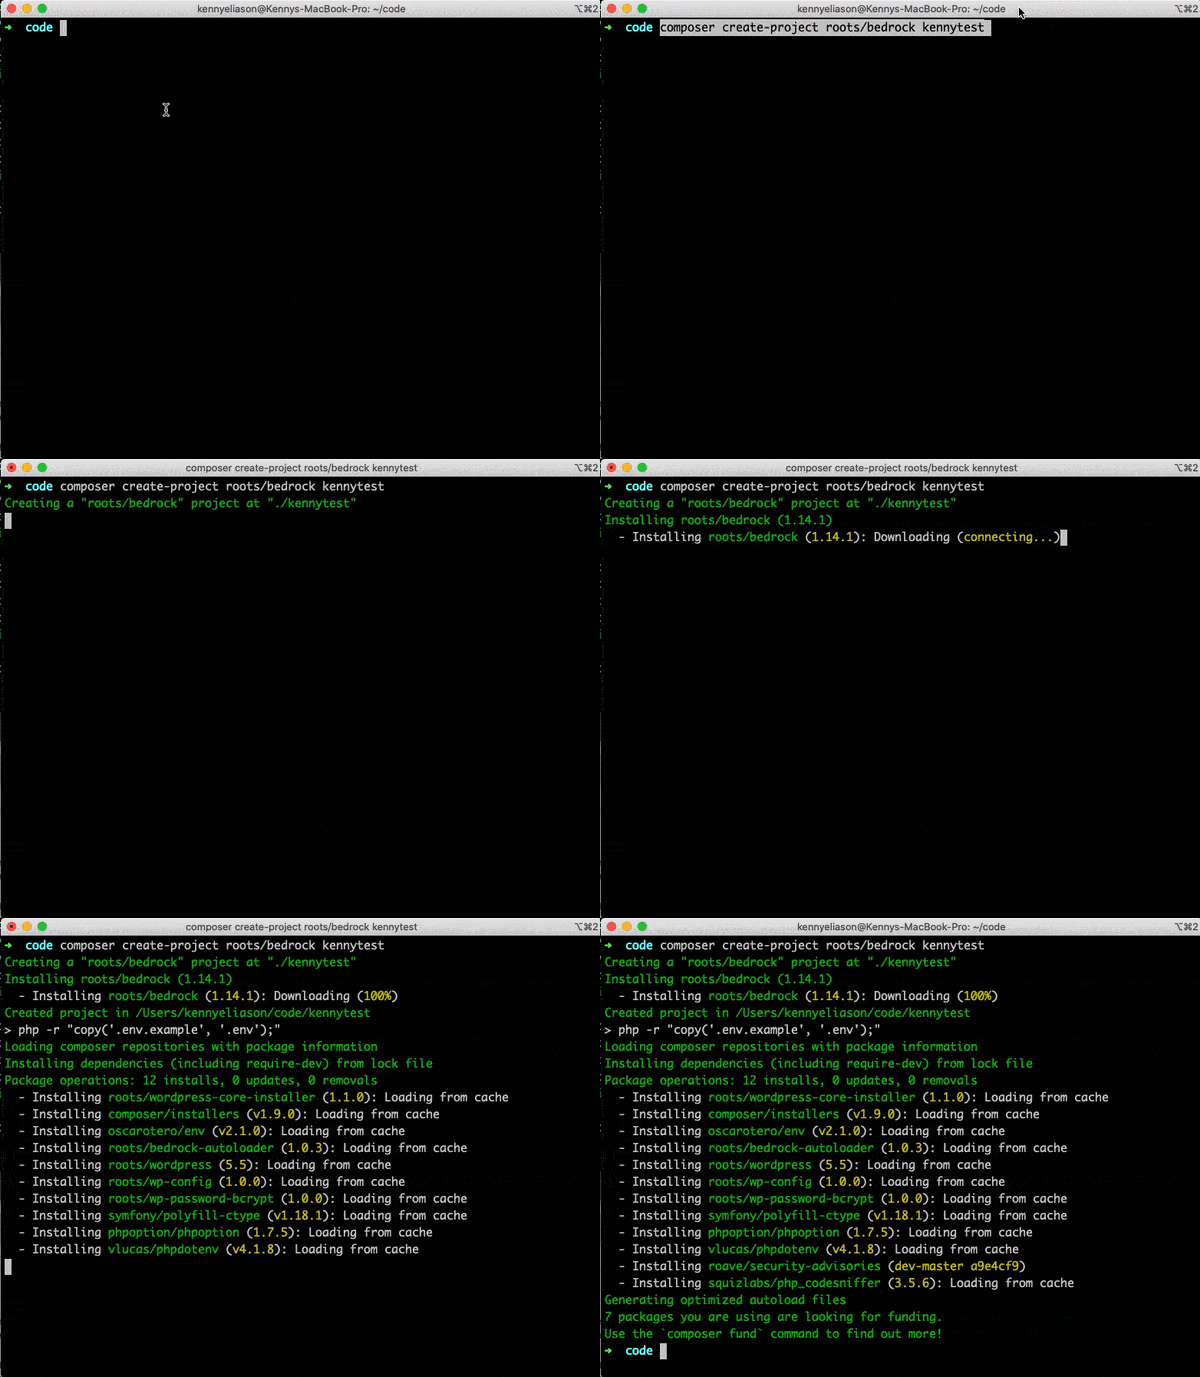
Next, you’ll need to install Bedrock, which is done using composer. From the command line, you’ll run the following command inside of your development folder, replacing {sitename} with your site name. This should be a different name than your permanent site name so that you don’t overwrite any files:
composer create-project roots/bedrock {sitename}

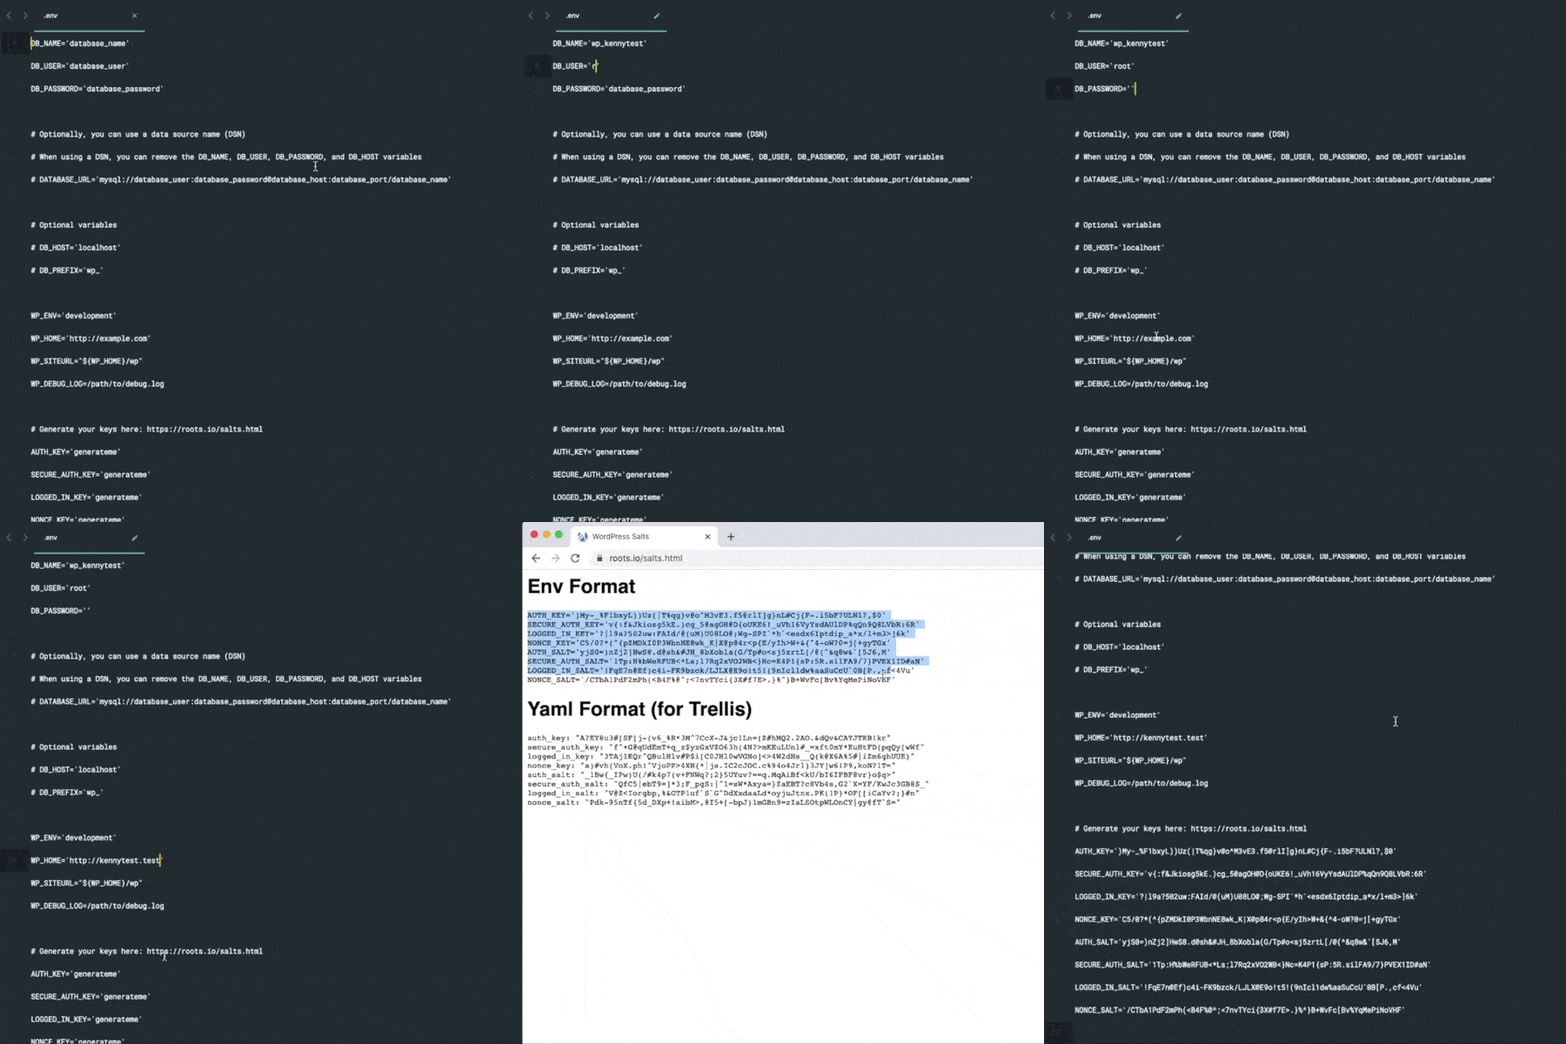
You’ll then need to open the .env file and rename all the variables according to your new site’s specifications:

Step 2 – Migrate over the Themes folder from the Vanilla WP Site
One thing to note when it comes to your new Bedrock site is that the folder structure is much different (read better 😉) than the standard WordPress way of doing things. Instead of a wp-content folder, you will find an app folder inside of the “web” directory.
You’ll need to move the themes from your current vanilla WP site over to your new Bedrock install. From your development directory, from the command line I would use a command like this one:
cp -R {vanillawpsite}/wp-content/themes/* {bedrocksite}/web/app/themes
That should create a copy of every theme you were using on your old site on this newly created Bedrock site.
Step 3 – Migrate Plugins
This step is a little more time intensive as we’re going to properly install all of your plugins using Composer.
A composer version of every free WordPress theme and plugin can be found on WP Packagist, which we are definitely going to use.
Your premium plugins are going to be a little more complicated… we’ll get to that later.
Navigate to your vanilla WP directory and using the WP-CLI tool, you’re going to get a complete list of all the plugins on your site.
wp plugin list
You have two options at this point, navigate to wpackagist.org and look up each plugin one by one, which might be easy if there aren’t very many plugins.
To install them with composer, you can install each free plugin by using the following command:
composer require wpackagist-plugin/{plugin-string}
For example, installing the Advanced Custom Fields plugin would look like this:
composer require wpackagist-plugin/advanced-custom-fields
Go through one by one and install all of the free plugins.
I prefer to do it in bulk, but it involves copy and pasting the list of plugins output by ‘wp plugin list’ into Excel, transposing, concatenating… etc. If you’re an Excel person, you’ll probably figure out what I’m talking about. You can install multiple composer files at a time by listing them out one at a time, like this:
composer require wpackagist-plugin/advanced-custom-fields wpackagist-plugin/akismet wpackagist-plugin/bbpress wpackagist-plugin/classic-editor wpackagist-plugin/google-analytics-for-wordpress
How to Install Premium Plugins with Composer
Premium plugins are an entirely different animal, luckily more and more plugin devs are adding the ability to install their plugins via composer, like Yoast (Side note, Yoast is a fan of Bedrock 😃).
If your developer still hasn’t added that feature, we suggest looking into setting something up like Satispress on another install of WordPress to manage your premium plugins. It’s a bit of extra work at the beginning, but it makes for a stellar premium plugin repo for later!
Step 4 – Migrate Uploads Folder
Depending on the site, this could be where a majority of the bulk of your file size could be located. You’ll likely want to use rsync from the terminal to move everything so that you can repeat the process if necessary. Here’s the command I like to use:
rsync -vrz {vanillawp/wp-content/} {bedrock/web/app}
Make sure you have the trailing slash after “wp-content” so that it copies the content of the directory, and not the directory itself.
Step 5 – Importing the Database
A quick way to get a copy of the vanilla database is to navigate to that folder on your local system and enter this WP-CLI export command:
wp db export
That short little one-liner will create a SQL dump file very quickly at the root of your site.
Copy that file over to your new Bedrock directory, and then run this WP-CLI import command:
wp db import
As long as there is only one sql file in the directory, it will find it and import it for you auto-magically.
But the fun doesn’t end there… This is where things can get a little tricky.
We need to search and replace a number of strings in the database, and to do that we’re going to use another WP-CLI command, search-replace. Since this is a new site and not your live site, we don’t have to worry about backups because if you destroy your DB, you’ll still have that vanilla WordPress install you can go and export again.
Here is a list of the commands you’ll want to consider running:
wp search-replace "{vanilla-wp-domain}" "{bedrock-wp-domain}"

wp search-replace "/wp-content/" "/app/"

wp option update home "http://{bedrock-wp-local-url}"

wp option update siteurl "http://{bedrock-wp-local-url}"
That should catch 90%+ of the changes needed to make your database work with Bedrock correctly.
If you’re using a page builder, you may have an additional step of searching out any more strings that need to be replaced as page builders usually escape the forward-slash in a URL.
Converting to Bedrock
Your site “should” be up and running by now… Every install is SOOOO different so I’m sure it wasn’t super straight forward or even super easy. But hopefully you’ve been able to muddle your way through it.
How to Convert Bedrock to Vanilla WordPress
Now for the reason most of you are here, this is how you would convert a Bedrock instance of WordPress back to your regular ol’ Vanilla WordPress.
We understand many people who build sites with WordPress don’t understand the additional functionality provided by Bedrock, and that is just fine. Hopefully this tutorial will help guide you on getting your site back to normal.
Here I’ll walk you through the basics of converting your site FROM Bedrock TO Vanilla WP.
Step 1 – Install Vanilla WordPress
Create a folder for your new vanilla WordPress site, and enter into the new directory. From that directory enter the following, one at a time:
wp core download

wp config create --dbname={vanilladb} --dbuser={vanilladbuser} --dbpass={vanilladbpass}
Step 2 – Copy app to wp-content Directory
The app folder on the bedrock install contains everything you’ll need for your vanilla wp-content folder. To copy those over you can use one of two scripts. I prefer using rsync, especially if you have a large uploads folder.
rsync -vrz {bedrock/web/app/} {vanillawp/wp-content}
Rsync allows you to run it a few times but not copy over the same files every time. But if you don’t want to use rsync, you can use the regular copy command as well.
cp -R {bedrockwp/web/app/} {vanillawp/wp-content}
Make sure you have the trailing slash after “app” so that it copies the content of the directory, and not the directory itself.
Step 3 – Remove Unused mu-plugins
You’ll want to take a quick peak at your wp-content/mu-plugins directory and remove anything bedrock related, some of those that should be removed are:
- bedrock-autoloader.php
- disallow-indexing.php
- register-theme-directory.php
Step 4 – Import Database
From your functioning Bedrock install directory, run the following command to export the database:
wp db export
Then move or copy that file over to your new vanilla WordPress directory and run:
wp db import
Then to get the database running as it should, run the following search-replace commands one at a time:
wp search-replace "{vanilla-wp-domain}" "{bedrock-wp-domain}"

wp search-replace "/app/" "/wp-content/"

wp option update home "http://{vanilla-wp-local-url}"

wp option update siteurl "http://{vanilla-wp-local-url}"
Converting to WordPress
Now that should get you going on your vanilla WP site. I’m sure you’ll run into at least 1 problem, though, so brace yourself. Be creative and use the above information to find a solution, I’m sure you can do it.
Converting To/From Bedrock Bash Script
If you made it this far in your quest, you are now worthy to have the golden script… This script is not perfect, but it does all of the things I laid out above in a fraction of the time, all automated.
So far we have only built out half of this script… Going from Bedrock to WordPress as that seems to be the most easily scripted. You’ll want to use the following command once you have the script downloaded:
sh makewpsuck.sh --more
The script name was inspired by a previous script I had seen on the internet, but can no longer seem to locate. So we created a new one ourselves.
Download the script by clicking the image below:

