How to Install an SSL Certificate on WordPress in 8 Steps
With the recent announcement from Google that they will be requiring security certificates on websites (or face the consequences of being deemed “insecure), we have found ourselves installing certificates on many websites even in the past few days. Since we’ve gotten the process pretty dialed in, we thought that others might find our process valuable as well.
8 Steps to Installing an SSL Certificate on WordPress
Step 1 – Buy Your SSL Certificate
We have found that the quickest and easiest way to get a new SSL is to go straight to your current host and see what options they are offering. Yes, you could go to letsencrypt or some other third party service, but most of the time the hassle associated with getting a third-party certificate installed onto your host isn’t worth the few bucks you’ll spend just purchasing the cert from your host, straight-up. So, log onto your host, find their SSL options and buy the one that meets your needs.
Step 2 – Install the Certificate
When purchasing a certificate, you typically have to go through a series of email confirmations to verify that you are in fact the owner of the domain and that you are going to use the certificate with that domain. This step may require setting up a new email address if one of the verifiable email addresses offered doesn’t already exist, so be ready for that.
Step 3 – Backup Your Website
Before we make any changes to the WordPress website, we, of course, should make a backup of the website. We here like to use the free version of BackWPup. Install the plugin, run the backup and save it to your desktop for safe keeping. We probably won’t need it, but it’s good to have just in case we have to go nuclear and undo everything.
Step 4 – Change the WordPress Settings
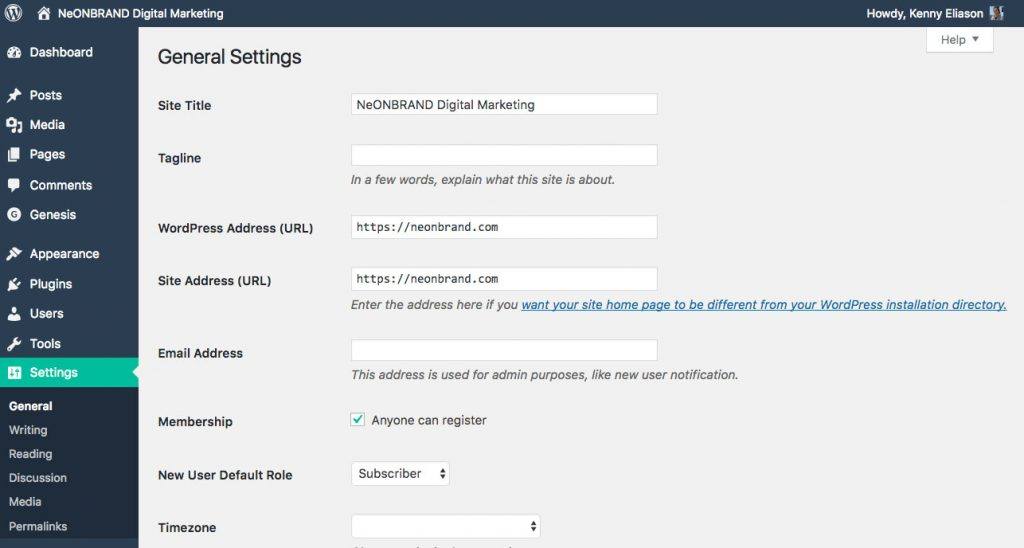
After having successfully backed up your website, you’re ready to make some changes to the settings. On the left sidebar navigation inside of the WordPress dashboard, go down till you see “Settings” and click on General. On the right side of the window, you’ll see two boxes, the WordPress Address (URL) and the Site Address (URL).

You are simply going to add the letter “s” after the “http” in both instances so that in the end you have a domain that contains the entire URL “https://mydomain.com.”
Step 5 – Install “Better Search Replace” Plugin
Now that you have your site switched over, your content still contains a lot of old links that point to the non-https version of your site. We’ll use the Better Search Replace plugin to fix that problem.

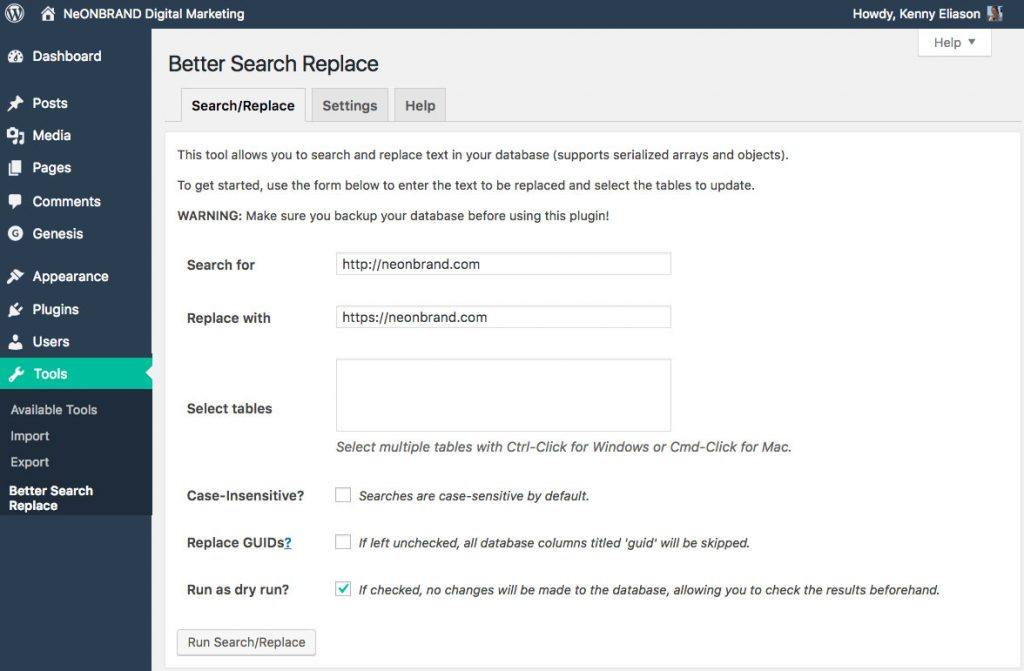
After installing and activating the Better Search Replace plugin, you’ll find a new option available to you under the Tools option in the left sidebar of the WordPress dashboard.
In the “Search for” box, enter your old “unsecured” URL (HTTP without the “s”) and in the “Replace with” box, enter your new “secured” URL (https with the “s”). You can run a test to see how many URLs will be effected by simply leaving the dry run box at the bottom checked. This will return the results to let you know how many database tables will be affected.
Once you’re ready to go, uncheck the dry run box and let the plugin run it’s magic.
Step 6 – Install “SSL Insecure Content Fixer” Plugin
Just by installing and activating the SSL Insecure Content Fixer plugin you’ll take care of a few other potential weak points for insecure content. Things a developer would normally have to fix, but does it a lot quicker with this plugin. That’s an easy one.
Step 7 – Add 301 Redirects By Modifying Your .htaccess File
If you don’t feel comfortable editing the .htaccess file on your site, please contact a developer. But with relative ease, you can add the necessary couple lines to this file that will automagically redirect all of your old URLs to your new secured URLs. Here are the two lines you can add at the bottom of your .htaccess file.
<IfModule mod_rewrite.c>
RewriteEngine On
RewriteCond %{SERVER_PORT} 80
RewriteRule ^(.*)$ https://your-dope-domain.com/$1 [R,L]
</IfModule>
Step 8 – Test Test Test!
After having gone through the above steps, it’s now time to test your website so make sure you’re getting the green https on all of your pages. There may be something that slips through the cracks, so it’s important to make sure you fix anything that may be left over! You can also use the SSL Insecure Content Fixer to run a test on your site to make sure things are running correctly.
You can also use the SSL Insecure Content Fixer to run a test on your site to make sure things are running correctly. On the left sidebar under the tools drop down you’ll now see an option for “SSL Tests.” Just click that link and a test will run to make sure you’re running securely.
And that’s it! You’re done! Easy, right? :/

