How to Set Up Google Webmaster Tools
Looking to add your website to Google but not sure where to start? Google has provided a pretty awesome tool for making sure your site is indexed in the search engines, as well as providing tons of information about the health of your website in regards to your search engine rankings. What tool is that you ask? Webmaster Tools. Here’s how to configure your site for the first time:
Google Webmaster Tools – Add Your Site
After signing up for webmaster tools, you’ll be prompted to add a site. For this example, I’ll be using a brand new domain, vegasseomeetup.com.
- Step 1: After signing up for Google Webmaster tools, you can add your site by entering it into the “ADD A SITE” box in the center of the screen, or if this is your second time adding a site, the button is moved up to the top right corner.

- Step 2: Verify ownership of the domain. Google gives you many options on how to get this done. My favorite is to use the “Alternate Method” of using an HTML tag. If you’re using WordPress and the SEO by Yoast plugin, this is a relatively simple process. Once you click on the HTML tag option, you’ll be given a little snippet of code to place into the <head> section of your website. Yoast simplifies this by providing a box to enter the “content” portion of the snippet right into your website. Here are a couple of images to help explain:


- Step 3: Important tip in adding your site to Google Webmaster Tools! Repeat steps 1 & 2 for your domain name, with the “www” as well! So in this example, we would need to also add: https://www.vegasseomeetup.com. The nice part is that the HTML tag remains the same, so you can quickly verify the second domain name.

Google Webmaster Tools – Site Settings
After your domains have been added, you’ll want to configure them so that they are crawled appropriately. Under site settings is where you will set your Geographic target and Preferred domain.

For most of my readers, your Geographic Target will probably be the United States. Your preferred domain can be left to your discretion. Either the www or non-www is fine and neither really provides an additional benefit over the other. But you’ll want to be consistent with whichever one you use. One place to see which version your site might be using is under the Settings -> General inside of the WordPress backend.

Google Webmaster Tools – Sitemaps
The last thing I would be sure to configure when adding your site to Google Webmaster Tools would be submitting your sitemap. You do this by clicking on “Crawl” in the left navigation column, then “Sitemaps”. If you’re using the SEO by Yoast plugin, he builds perfect sitemaps for you automatically. To get the link to your sitemaps, go to the XML Sitemap link under the Yoast Settings (For more info on how to configure Yoast, see this blog post). By clicking on the “XML Sitemap” button, it’ll pull up a page that lists out all of your available sitemaps.


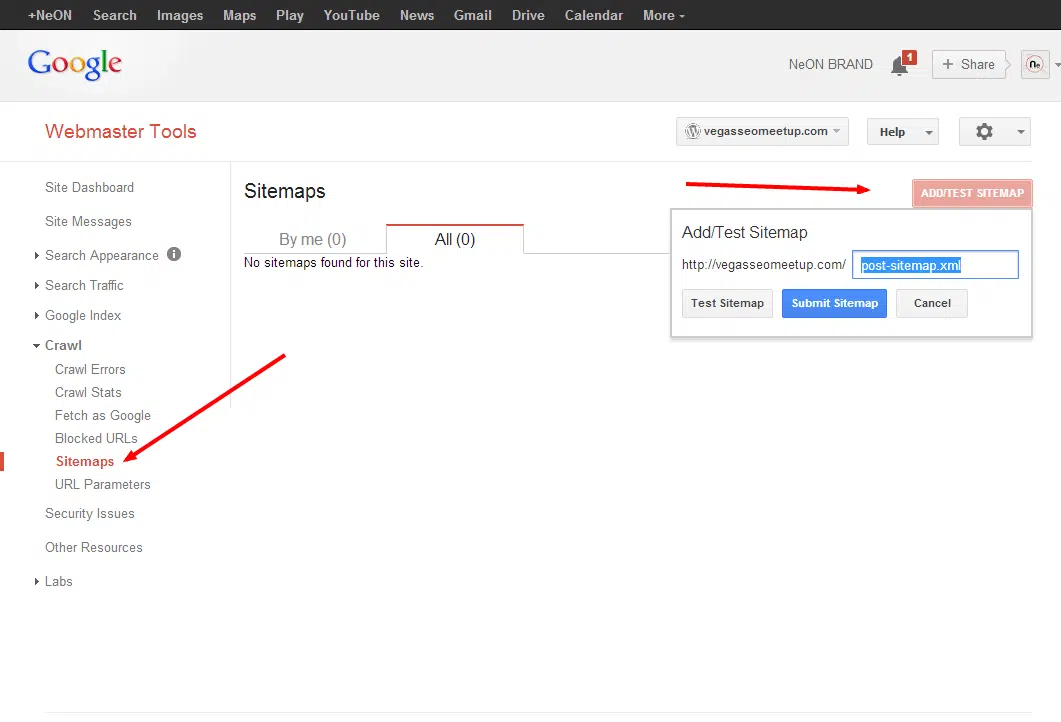

You’ll need to add them to Google Webmaster Tools individually from here. Start with the first one and enter it into the box that pops up with you click on “ADD/TEST SITEMAP” button. You can test it if you would like to, this just allows you to be sure the sitemap is working. But eventually you’ll want to push the “Submit Sitemap” button. After you’ve submitted all of the sitemaps, your finished page should have all of the sitemaps listed, along with all the pages and posts counted up and displayed.
Google Webmaster Tools – Additional Tips
Moving down the left sidebar, here are some additional resources to consult when monitoring your website through Google Webmaster Tools.
Structured Data
Structured Data is still a relatively new methodology, but it has been approved by all three major search engines, just check out schema.org for more information. Under the Structured Data section, you are provided with what Schema information is working on your site and it will also tell you if there are any issues with any of it so that you can make corrections. If you’re new to Schema markup, you’ll probably have errors… since it can be pretty confusing stuff!

HTML Improvements
People pay services like Moz lots of money to give them information regarding the health of their website. On this tab, Google provides you with accurate information regarding issues that may effect your SEO rankings in Google. Monitor this tab closely and be sure to make any changes as recommended.

Sitelinks
You may see from time-to-time that Google provides additional links under your search results. These are auto-generated by Google’s algorithms and are sometimes incorrect. Here you can tell Google to remove that link from your search result so that your search results are more accurate.

Search Queries
Once your site has a little history under it’s belt, this page will start showing search terms that have displayed your website in the results. This can be a keyword goldmine since it displays your ranking position and how many impressions you’re getting. I’ll often sort by “Avg. Position”, find the query I’m ranking at spot 11 (top of page 2) or higher, and use that for a new search term. That’s some “low hanging fruit”!

Links to Your Site
This is a tab that can make or break your search engine results. Keep an eye on this tab to be sure your site doesn’t become the target of a bad-link bomb. If you see a bunch of random links showing up from non-reputable sites, you might want to check out the Disavow Links Tool. Use extreme caution when using that tool, but it can be a lifesaver if your site gets hit with spam. This is also a great place to monitor how many awesome links you have just from being a great website. So keep an eye on this tab.

Crawl Errors
If you’ve ever changed a URL to a page, or maybe someone linked to your site incorrectly, Google will display those errors on this page. 404 errors are the most common occurrence here, and can be remedied by putting a 301 redirect in place on your website. To manage my 301 redirects, I use the Redirection plugin. This plugin also has an import feature so that if you have a ton of 404 errors in Google Webmaster Tools, you can export those as a CSV file, paste in the new URL for where you want the bad link to go, then import it through the plugin settings. Makes life a lot easier if you’re working on an older site with a lot of bad links.

Linking Your Google Analytics and Google Webmaster Tools
Last piece of advice for adding your site to Google Webmaster Tools is to link your Google Analytics account to your Webmaster Tools account. This is found under to top right gear, “Google Analytics Property”. Just select the site from the provided list and click save. By connecting the two accounts, you are able to gain additional insights inside of Google Analytics, but we’ll save all that for a future blog post.

Google Webmaster Tools – Summary
There is a LOT of information to be found inside of this glorious tool, and this post only skims the surface. Spend some time getting familiar with Google Webmaster Tools and save yourself a lot of headaches regarding your search engine rankings and the health of your website.
Comment below if I’ve left anything out, or if you have any questions or suggestions.
