
After having put this whole, very long blog post together, I got to thinkin’. It would be really slick if you could track your progress here. So I built a little checkbox tracker for anyone who logs in. It actually allows you to save your progress so you don’t have to sit and do the entire thing at one time. It’s pretty awesome. Register and give it a look. I think you’ll dig it.
- Choose a Good Host
- Start with a Solid Framework/Theme
- Optimize Images (Automatically)
- Resize Images for Mobile
- Use Properly Sized Images in Your Posts
- Use the Correct Image Type
- Use an Effective Caching Plugin
- Use a Content Delivery Network (CDN)
- Control the Amount of Post Revisions Stored
- Limit and Remove Spam
- Delete Trash after a Certain Number of Days
- Add LazyLoad to Your Images
- Optimize Your Homepage to Load Quickly
- Optimize Your WordPress Database
- Add an Expires Header to Static Resources
- Use CSS Sprites
- Load Code Libraries from Google
- Keep Everything Up-to-Date
- Host Videos Externally
- Fix Any 404 Errors in the Code
- Disable Pingbacks
As I was putting this list together, I was amazed by how many awesome resources for this information are already out there on the web. I’ve gathered what I think are the most important ones and put them together here in a nice easy format. Oh, and just a heads up: Since I’m a user of a lot of these services, there are affiliate links throughout the post. I don’t think I’ve ever made a dime off those links, but they’re there nonetheless.
1. Choose a Good Host

There are approximately 1.2 billion hosting providers out there… Okay, maybe that’s a slight over exaggeration, but still. There are a ton to choose from. As people have gotten smarter, some really great hosts have emerged to help make your hosting experience incredibly painfree. Here are some options:
What Is WordPress Managed Hosting?
Since WordPress is dominating the web, a few wise folks noticed this trend and decided that they could help make the experience even better by building servers specifically designed for WordPress websites.
What does that mean? Well it gets into a bunch of super nerdy stuff that even most web developers don’t care to understand, but we’ll simplify it by saying they cut out a lot of the extras that come with a normal host because they know exactly what files you’ll be using with your WordPress installation.
There won’t be one guy needing joomla on the server and another guy needing a ruby application. Nope, all their servers handle are WordPress Websites. This makes WordPress sites run incredibly well on their hosting environments.
Top WordPress Managed Hosts
- WP Engine (Recommended by ME!)
- Synthesis (Recommended by Yoast)
- SiteGround
- GoDaddy
Non-WordPress Hosting Options
There may be the rare case that you don’t want to use WordPress managed hosting, maybe the cost is just too much right now. Here are some options for you:
Regular Hosting Options
- Media Temple
- SiteGround
- inMotion
Regular Hosting Don’ts
- Hostgator
- GoDaddy cheap hosting
- Any “dollar” hosts
- Avoid anything owned by EIG (If you don’t know about them, you should.)
All finished? Back to the top.
2. Start With a Solid Framework/Theme
Do this one again?
The speed of your website really comes down the the code installed on your domain. Some themes are very fast, and some are super slow.
Fast themes are minimal, they don’t have a lot of extra features or shiny objects, they get the exact job done without loading anything extra that you may not be using. ?
Slow themes brag about their hundreds of features, of which you only end up using two. Then you have a theme that loads a bunch of stuff you’re not even using. ?
What is a WordPress framework?
A WordPress framework is a lot like a parent theme on wordpress, but is used in a different way.
A WordPress framework is a set of code that provides new functionality and resides between the code from WordPress and the code provided by the theme developer.
Here’s a visual:

Is a WordPress framework for everyone?
This is where I’ll give an enthusiastic NO. A framework is not for everyone, especially if you’re on a budget and looking to snag a $40 theme and be done with it.
But for those building a solid online reputation that is going to last for a long time… Yes, a framework is the way to go.
Top WordPress Frameworks to Consider
All finished? Back to the top.
3. Optimize Images (automatically)
Do this one again?
One of the top reasons for slow websites online is bad image optimization. Aint nobody got time for that!
There are two ways to optimize an image, file size or image dimensions. We’ll look at both.
How to Compress (or Shrink) the Image File Size on WordPress
The quickest way to shrink the file size inside of WordPress without sacrificing image quality is by using the Kraken Image Optimization plugin. Just check out their demos and you’ll see how glorious the picture can still look while stripping out all the fluff that makes the file size too big.
Other options:
- Photoshop, Save for Web
- EWWW Image Optimizer Plugin
- WP Smush Plugin
How to Properly Adjust the Dimensions of an Image on WordPress
With the advent of mobile cameras, everyone can take an awesome picture. But guess what, by default your phone is taking pictures that are WAY too big for the web. For comparison’s sake:

And those screen sizes are the edge-to-edge dimensions of the screen. How often are people blowing up your pictures full screen? Not very, I promise.
Fact: Your images should usually max out around 1500 – 2000 pixels wide.
Fact: Your images should usually max out around 1000 – 1500 tall.
Tools to get it done:
- Photoshop, Save for Web
- Imsanity (resize on upload)
- Paint (Windows) or Preview (Mac)
All finished? Back to the top.
4. Resize Images for Mobile
Do this one again?
In case you weren’t aware, phones are smaller than desktops… big surprise, I know. ? So why load a big ol’ pretty image on the phone when it really doesn’t do you any good?
Quickest way of getting this done is, of course, via a plugin. Two recommendations here:
- Hammy plugin
- Adaptive Images for WordPress plugin
All finished? Back to the top.
5. Use Properly Sized Images Inside Your Posts
Do this one again?
With the vast amount of foresight put into WordPress development, they foresaw the problem with image sizes and load times. So what did they do? They gave us a slick way to load different-sized images right within the post editor. If you haven’t seen that before, here’s a gif:
The forethought here was that if you’re only going to show a little image to the right of your text, there’s no reason to load a big image that is then resized down smaller.
WordPress actually creates more than one version of your image every time you upload. So when you choose the medium sized image, the maximum width of that image is literally only 300 pixels wide. Perfect for most situations.
All finished? Back to the top.
6. Use the Correct Image Type

Do this one again?
JPG files have the highest compression rate, so they’re the most easily compressed file type. Make this your default, unless your image isn’t only an image.
If your image has text on it, or if you’re uploading a logo that has transparency, you’ll want to use a PNG file format. JPG’s tend to make blurry and they.
If you’re uploading an animated image, GIF is the only option for you here. But be sure to minimize them as much as possible in order to get the smallest file size. Also be sure to limit the dimensions as small as possible to help decrease size too, usually a max width of 700px is plenty.
All finished? Back to the top.
7. Use an Effective Caching Plugin
Do this one again?
For the record, cache ≠ cash. ? Two very different things. If you took the earlier advice on getting WordPress managed hosting, then your host is probably already doing an awesome job at caching your site for you.
When you cache your website, you are essentially allowing for your visitors to open a smaller and faster version of your website.
If you still have a regular host, then no worries. There are of course some plugin options out there:
- W3 Total Cache (Best free option)
- W3 Super Cache (Not as many options)
- WP Rocket (Premium $$)
All finished? Back to the top.
8. Use a Content Delivery Network (CDN)
Do this one again?
A CDN, or Content Delivery Network, helps load your website as fast as possible for people located in different geographic locations. Picture how Amazon fulfills orders:

When Amazon receives an order, it does a quick check to see which of their 28 fulfillment centers that has your product, is the closest to you.
A CDN operates in a similar fashion. When you browse to a website that benefits from a CDN, a quick check is done against your IP address, and you are subsequently routed to the closest data center near you. This makes your website load quicker for people who may be located in different locations, even all around the world.
Some options to consider:
- Max CDN
- Cloudflare (free option)
- Amazon Web Services
- Built in from Host (WP Engine!)
All finished? Back to the top.
9. Control the Amount of Post Revisions Stored

Post revisions provide the great ability to recover a previous version of your post or page. This can definitely come in handy from time to time.
Although handy, this is one area where WordPress struggles a little on optimization straight out of the box.
By default, WordPress stores an infinite amount of revisions in your database, which can lead to some major bloat. So, how do you fix it?
Of course, there’s a plugin for that. Check out the Revision Control plugin in the WordPress repository. Or for those who are a little more code savvy, a simple copy-and-paste will also do the trick.
Just place this code in your wp-config.php file:
define( 'WP_POST_REVISIONS', 2 );
define( 'WP_POST_REVISIONS', false );
And be sure to Optimize Your Database after Deleting Revisions…
All finished? Back to the top.
10. Limit and Remove Spam
Do this one again?
This one is a no-brainer, but often overlooked. We recently inherited a site that had no spam-prevention measures put in place prior to our involvement. The database was a whopping two gigs! After removing THOUSANDS of spam comments, the database was a nice few hundred megabits. It’s much quicker for your site to skim through a few megs of data, versus gigs of crap!
Akismet is the Automattic solution to comment spam, and I’d say it does a decent job at catching most comment spam.
We sometimes take things one step further and on top of Akismet we install the Stop Spammers plugin. This plugin gives numerous more settings to really bring comment spam to a complete hault.
All finished? Back to the top.
11. Delete Trash after a Certain Number of Days
Do this one again?
Another nice feature of WordPress is that it keeps a trash file for those times when you accidently delete a post instead of saving it…

Didn’t seem like anyone had made a plugin out of this one yet… so I went ahead and put one together. You can download it right now from this page. Enjoy!
For those who are more code-savvy, feel free to throw this little code into your wp-config.php file and change the number 5 to the number of days you’d wish to save your trash items.
define( 'EMPTY_TRASH_DAYS', 5 ); // 5 days
All finished? Back to the top.
12. Add LazyLoad to Your Images
Do this one again?
Lazy Load delays loading of images in long web pages. Images outside of the viewport are not loaded until the user scrolls to them. This makes the top of your page load quickly because the images down at the bottom don’t get rendered right away; it’s pretty awesome.
Of course there are some plugins for this:
- jQuery Image Lazy Load plugin (very old)
- Hammy plugin (used for mobile optimization, but also has a lazy load component!)
Or for the real nerds in the room, straight up jQuery option found here: Lazy Load Plugin for jQuery
All finished? Back to the top.
13. Optimize Your Homepage to Load Quickly
Do this one again?
Since a lot of visitors come by way of the homepage on your website, it makes sense for it to be possibly the fastest page on your entire site. Here’s a short (not all-inclusive) list of things to consider when trying to speed up your homepage:
- Remove anything not considered relevant to the visitor on first visit
- Remove auto-play videos
- Show fewer blog excerpts
- Remove share buttons
- Limit queries to the database
- Shrink down images
- Use CSS styling whenever possible
All finished? Back to the top.
14. Optimize Your WordPress Database

Imagine this: You’ve been buying clothes for 10 years. As you buy more clothes, you just keep shoving them into your closet. The more clothes you have in that closet, the more time it takes you to find that favorite high school shirt you kissed your sweetheart in.
Your WordPress database can start to fill up the same way. Plugins that are installed and then removed often times leave behind extra tables in the database that you’re no longer using. So why keep them around?
Over time there is an extra amount of bloat that starts to accumulate. It’s good to clear that out every once in awhile.
MAJOR DISCLAIMER: Before doing any changes to the database, make sure to get a backup first! And not just a backup of the files – we want the whoooole database.
Here’s some ideas to help optimize your database:
Option #1: Use a Plugin
WP-Optimize
The WP-Optimize plugin does a great job at cleaning up your database so that it’s a little faster and more responsive. It is by far has the highest ratings and most active installs in the repository for this sort of thing, so definitely check it out.
WP-Optimize Plugin Download
Plugins Garbage Collector
This plugin will scan your database and then return to you the tables in the database that are likely not being used at this time. Use at your own risk, as it’s not a perfect system and deleting a table for a currently activated plugin would wipe out your settings.
Plugins Garbage Collector Download
Clean Options
There are a handful of tables in your database that are required to be there in order for WordPress to function properly. One of them is the wp_options table. This table also has the ability to store a lot of extra data for plugins installed on your site.
Since the same logic applies, there is probably a lot of data in there that you’re no longer using. Removing it would help optimize your database. This plugin helps identify which things can possibly be removed.
Clean Options Download
Option #2: Dig into Phpmyadmin and Edit the Database Directly
This option is definitely not for the faint of heart. But for those willing to dig into the database directly, there are a couple things to look for.
Remove Unused Tables
Most tables that are installed with a plugin start with a unique prefix. They should be pretty easy to identify.
Once you’ve made sure they’re no longer being used, go ahead and DUMP the table from the database.
Remove Old Rows in wp_options Table
Navigate to the wp_options table and browse through the rows of data found there. The option_name column will be your only reference to what the row may be related to.
For example, the Yoast SEO plugin inserts a few rows in this table:

Go ahead and delete any rows you think are no longer needed.
Remove Revisions
In the wp_posts table, do a quick select for all post revisions, like so:

SELECT * FROM `wp_posts` where (`wp_posts`.`post_status` = 'inherit' || `wp_posts`.`post_status` = 'auto-draft' || `wp_posts`.`post_status` = 'trash') && `wp_posts`.`post_type` != 'attachment';
Once you’ve identified that the selected results are no longer needed, go ahead and delete all of them.
All finished? Back to the top.
15. Add an Expires Header to Static Resources
Do this one again?
Setting expires headers on your website can help with speed, but also must be used cautiously.
The purpose of expires headers is to limit the number of http requests your site has to make when loading on your visitor’s computer.
Setting expires headers on inappropriate resources could really cause issues, so be cautious when adding them.
I’ve found that setting expires headers on images is typically a safe idea, and is pretty quick to apply with a plugin or manually:
Far Future Expiry Header
The plugin works its magic and does all the work for you. Easy to use.
Far Future Expiry Header Download
Manually Add to HTACCESS
Make sure to create a backup of this file before proceeding! Add this to the bottom of your .htaccess file:
ExpiresActive On
      ExpiresByType image/gif A2592000
      ExpiresByType image/png A2592000
      ExpiresByType image/jpg A2592000
      ExpiresByType image/jpeg A2592000
All finished? Back to the top.
16. Use CSS Sprites
Do this one again?
This is a really great way to reduce the number of images you load onto your webpage, although it’s slightly complicated to implement.
When using CSS sprites, you essentially combine images into one file and load the one file via your stylesheet, thus turning five, six, or fifty images into a single image call. Then you use the background-position property on the individual elements to only show the part of the larger image that applies to that one item.
I know, it’s a little confusing and will take a lot more to explain in detail. For now, here are a couple tools to help you on your learning adventure:
All finished? Back to the top.
17. Load Code Libraries from Google
Do this one again?
This is a pretty slick one, as it relieves a lot of stress from your site’s servers and puts it onto Google’s servers. They can afford it!
Of course, the quick way is to use a plugin: Use Google Libraries
That plugin is pretty slick because it lets you pick which of the numerous code libraries you want to swap out with Google’s version.
If you want to go the manual route, just throw this in your theme’s function.php file (snipped only for jQuery library):
//Making jQuery Google API
        function modify_jquery() {
        if (!is_admin()) {
        // comment out the next two lines to load the local copy of jQuery
        wp_deregister_script('jquery');
        wp_register_script('jquery', 'https://ajax.googleapis.com/ajax/libs/jquery/1.8.1/jquery.min.js', false, '1.8.1');
        wp_enqueue_script('jquery');
      }
    }
    add_action('init', 'modify_jquery');
All finished? Back to the top.
18. Keep Everything Up-to-Date
Do this one again?
I know, everyone is scared to update their WordPress sites. Good job developers into creating this horrible situation. Updating is an essential thing to do for a ton of reasons, speed being one of them!
An obvious disclaimer, be sure to backup your site before running updates. That way if your developer changed the core files to a plugin, them or WordPress core, you can at least quickly roll back to the previous version and figure out what caused the issue.
All finished? Back to the top.
19. Host Videos Externally

Do this one again?
Turns out your server isn’t optimized for hosting video files, but there are sites that are GREAT at it. Namely:
- YouTube
- Vimeo
- Wistia (great option if you don’t want people to browse your videos off of your website)
Whenever possible, use one of these sites to host your video files as this will help reduce the server load on your site.
All finished? Back to the top.
20. Fix Any 404 Errors in the Code
Do this one again?
Your website loads a bunch of files every time it is displayed. Sometimes one of those files may get deleted and you won’t even realize it. But every time your site loads, it still tries to load that one file that doesn’t exist, wasting seconds of valuable load time.
Using Google Chrome, right click anywhere on your website and click the “Inspect Element” button. This will bring up a little window at the bottom of your page. Now click on the “Network” tab. With the network tab open, refresh the page. You’ll get a result like this:
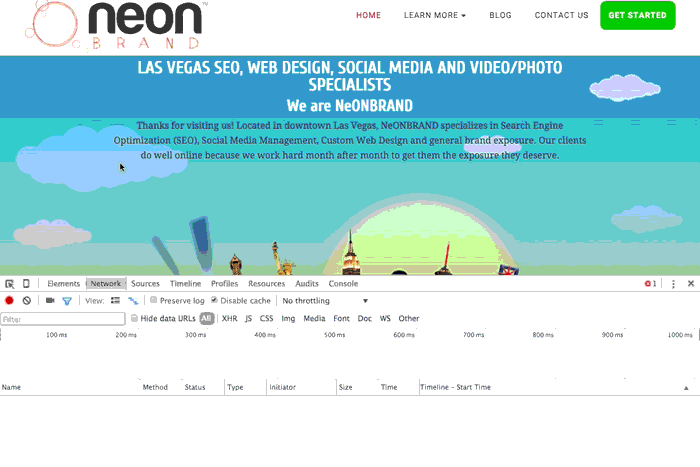
Anything in RED is going to be slowing you down. Fix it!
All finished? Back to the top.
21. Disable Pingbacks
Do this one again?
Here’s a quick one for ya: just go to Settings -> Discussion and uncheck the box that says, “Allow link notifications from other blogs (pingbacks and trackbacks) on new articles,” like this:

All finished? Back to the top.